
Hi, I’m Vicky, bike mechanic and Double Drop ambassador. In this my second Mechanics 101 blog I’m going to scrape the surface of the murky world of bike suspension with a view to helping new riders understand them better and feel more confident in setting them up to your advantage. Hopefully, it may answer questions you never felt able to ask. People can be nervous about suspension but, like all mechanics, if you stay calm and think things through logically it all becomes clear! Servicing suspension at home is possible but it’s not something I’d suggest for a newbie mechanic and there are companies across the UK who offer very good suspension repair and servicing by post.
Suspension systems literally offer a ‘spring’ to help soften your ride, making it more comfortable. You can make them work for you to help traction on the trail and help negotiate features, but equally, if they’re not set up correctly they can contribute to you being bucked off your bike!
Basic principles
We talk about hard tail and full suspension (full suss or soft tail) bikes – hard tails have suspension in the front fork, full suss generally have two suspension points – the front forks and a shock which links the main triangle of the bike and the rear triangle where the rear wheel sits.
Travel – literally the distance that the stanchion is able to travel in its full range of movement. Cross Country (XC) bikes have as little as 100mm travel, trail bikes approximately 130mm, enduro or all mountain 150-170mm and downhill 200mm+. When talking about the travel of a full suss bike, this generally refers to the travel in the shock, rather than the fork. For example, some bikes have 140mm forks and 130mm shocks but will be described as having 130mm travel.
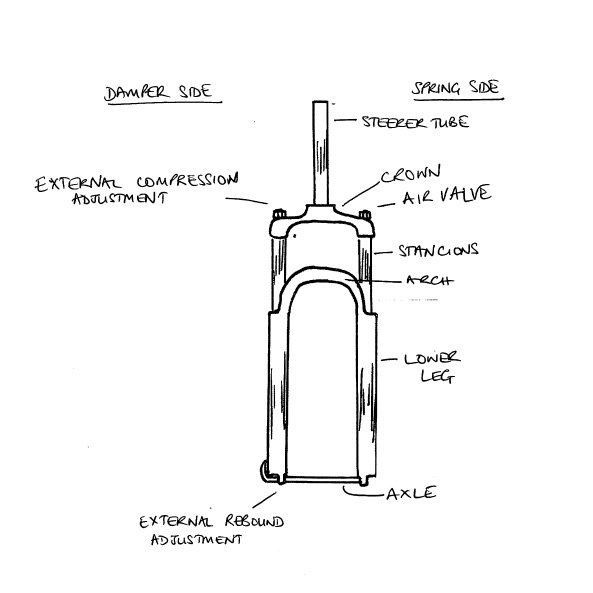
No matter what travel your forks provide they are made of two vertical pieces (legs) linked by horizontal bars (crowns). Each vertical element has a stanchion (upper) which slots into a (lower) tube that sits on the hub of the front wheel. The stanchion needs to run smoothly and freely in and out of the lower to enable the suspension to work. This can be externally controlled but is also dependent on the good maintenance of the forks – scratches on the stanchions, dirt in the seals, pressure washing, lubrication and servicing all have an impact on the way they work.
The left-hand leg of a fork contains the compression and rebound dampers that affect how the fork moves. Compression is controlled from the top of the fork. When it’s fully open the fork can move freely. When it’s limited or closed the fork becomes stiffer and barely moves – essentially compression controls the speed and ability of the fork to move down. Rebound is controlled from the bottom of the fork and sets the speed at which the fork returns to its original position. If the rebound is too slow then the fork may not have time to return to it’s base position before it needs to move again – for example, if you’re riding over roots or rocks – which means that your wheel will not be able to grip the trail as well and the bike will feel hard and skittish. If it’s too fast you can find that you are losing energy and speed as you pedal as the bike is absorbing every bump it comes into contact with.
The right-hand leg contains the spring. Entry level forks will have a metal coil and it’s not possible to adjust these for the rider. Coil springs react in a linear and predictable way. Air springs have a curved, progressive response: the amount of effort required to make it work grows as you push down through the stroke (the name given to the downward movement of the stanchion in the fork). The greater the air pressure in the chamber the more force is required to get the fork moving.
Shocks can either be air or coil spring and have compression and rebound adjustments that work in the same way, just they’re housed within a single stanchion.

Basic set up for air springs (fork and shock)
As a rule of thumb I put the rider’s weight in kg as the air pressure in the forks eg 55kg rider = 55psi. You can add a few kg for their riding kit or simply set the sag when the rider is wearing their kit. For shocks I use double their weight in kg, so 55kg rider = 110psi shock.
Sag allows the suspension to extend as well as compress which means that you can effectively ‘lighten’ the bike by pushing down into the suspension and letting it come back up.
Setting sag – fully open the compression and set the rebound to it’s fasted point, inflate the fork and shock to the desired psi (using a shock pump) and push the O-ring on the fork/shock against the lower leg/air can. Ask the rider to climb onto the bike, stand up on both pedals and lean forwards then climb off without bouncing. You simply want to see how the suspension reacts to their weight. Rockshox often have gauges that show you the % sag for the amount of travel but not all brands do. Generally, for a trail or enduro bike you’re looking for 20-30% sag depending on what kind of trail you’re riding. The smoother the terrain the less sag you want as it simply absorbs energy as you ride. To increase sag you remove air pressure, to decrease sag you increase the amount of air pressure. The amount of sag needs to be roughly equal in both shock and fork otherwise you unbalance the bike which impacts on the traction to the trail and the feeling of stability as you ride.
Setting the compression and rebound can be very personal. The best way to do it is find a fairly typical hill or trail and spend a morning trying out different set ups on the same section. Start by counting the number of clicks of movement in the compression and rebound, set both to the midway point and then ride down the trail. See how it feels if you speed up and slow down the rebound and open/close the compression. If you’re riding park (smooth, sculpted trails) then you can afford to have your suspension firmer (therefore more closed and slower) as you don’t need it to work as hard at absorbing the features. If you’re rebound is set too fast you can feel that the suspension is almost throwing you off the bike as it hurries to get back to the start point.
When you brake you’re limiting the movement of the suspension, effectively compressing it. This is why it’s so important that you control your speed before you jump or turn so that your suspension is free to work as it needs to and help your bike grip the trail.
Additional modifications
Tokens/volume spacers/band – these are things that you can put in to reduce the volume of air within the fork or shock. This reduction in volume adds greater pressure meaning that it is less sensitive to little bumps but reacts better to big ones.
Ultimately, don’t be afraid to get out and play with the suspension and see what impact it has on your riding!

